BackupNetClone Installation
Step 2a: Setup a Backup Client with MS Windows
So you wish to backup some data that is currently on a computer running
Windows? Follow these instructions to share that data (securely) with the
BackupNetClone backup server:
- NOTE: These instructions are written for MS Windows
2000 or MS Windows XP (Home or Pro). If you have another version,
you will need to check the
cwRsync website and
verify a package is available for your operating system.
- Download the necessary program. You'll need to grab this file on the
Windows computer that you wish to backup (also called the backup
client. So from an web browser on the Windows computer, go to
cwRsync. Download the
cwRsync Server (yes, the server even though this program is
installed on the backup client). The filename should be
something like cwRsync_Server_2.0.10_Installer.zip.
- Open the downloaded .zip file and extract its contents, which
should be a file named something like
cwRsync_Server_2.0.10_Installer.exe.

- Run the installer .exe file.
- When you are asked, be sure to turn on the OpenSSH Server
component.

- (optional) You might wish to change the destination folder name
to something that will help you associate it with BackupNetClone. For
example, C:\Program Files\BackupNetClone cwRsyncServer.
- NOTE: When you are informed what the service account password is, you
don't need to write it down, since you won't need it to complete the
install of BackupNetClone.
- After completing the cwRsync Server install, you may delete the installer
.exe and .zip files from your computer.
- From the cwRsync Server Start Menu folder, open the rsyncd.conf
file in order to share the directories you wish to back up.

- Change the [test] section to match whatever directory you
would like to backup. Note that you can have multiple directories
to backup, and each one would have its own backup-config.*.sh
file in Step 5. If you are unsure
what to do here and just want the entire Windows computer backed up,
then use the following contents for your rsyncd.conf file:
use chroot = false
strict modes = false
hosts allow = *
log file = rsyncd.log
pid file = rsyncd.pid
secrets file = rsyncd.secrets

# Module definitions
# Remember cygwin naming conventions : c:\work becomes /cygwin/c/work
#
[path_to_backup]
path = /cygdrive/c
read only = true
transfer logging = yes
You want to make sure that the read only = setting is "true",
since the backup operation only needs to read the files in the
directory. Here's an example rsyncd.conf that works well
for me:
use chroot = false
strict modes = false
hosts allow = *
log file = rsyncd.log
pid file = rsyncd.pid

# Module definitions
# Remember cygwin naming conventions : c:\work becomes /cygwin/c/work
#
[customer_database]
path = /cygdrive/c/mysql
read only = true
transfer logging = yes

[main_documents]
path = /cygdrive/c/Documents and Settings/Administrator/My Documents
read only = true
transfer logging = yes
Whatever names you use within the [brackets] you'll need to remember
and use as the TGTSHR= setting in the
backup-config.*.sh file when you get to that step.
- Save and close your rsyncd.conf file.
- From the cwRsync Server Start Menu folder, open the
Private key for Service Account item.

- Choose File, Save As... and save the file somewhere you'll be able
to get to it from BackupNetClone. Name the file something like
remote_private_key.*.openssh where * represents a
simplified name (no spaces or capital letters or special characters)
of the current backup client. If BackupNetClone is somewhere
else on the Internet, then save this key file on a USB key or CD. If
BackupNetClone is on a DNS-323 on the same network, then save the key
to \\192.168.1.200\Volume_1 (or whatever IP address is
appropriate, as set in Step 1).
- Turn on the appropriate servers to be started every time your
Windows computer is turned on:
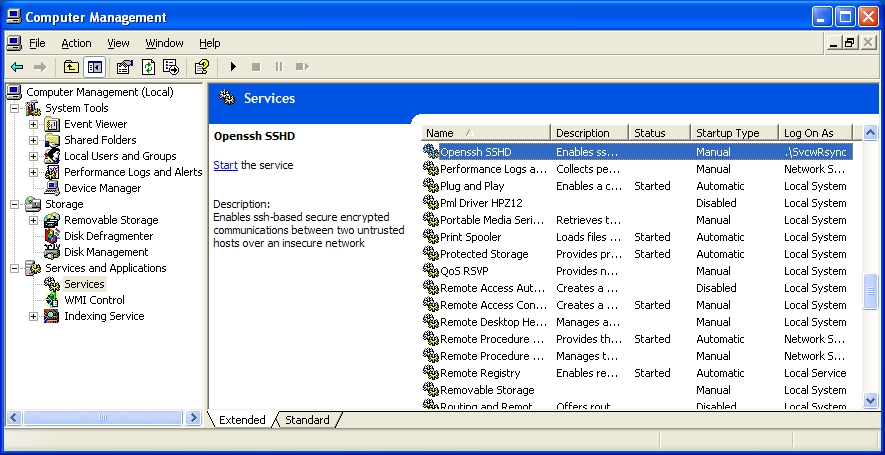
- Open the Services list. This can be found most easily by
right-clicking on the "My Computer" icon on your desktop and
choosing "Manage".

- In the Computer Management window double-click on "Services and
Applications" then double-click on "Services".

- Double-click on the "Openssh SSHD" service item.

- Change the "Startup type" from "Manual" to "Automatic". This
step ensures the secure tunnel will be available from this
Windows backup client all of the time.

- Push the "Start" button to start the service now, or you can
restart your computer to start the service.
- Press the "OK" button to close the properties window for
"Openssh SSHD".
- Repeat the above steps with the service named "RsyncServer"
instead of "Openssh SSHD".

- Congratulations! You've enabled an MS Windows
computer to be a BackupNetClone backup client. If you are
using BackupNetClone setup type B. Onsite Backup,
then you can move on to Step 3.
- For more help or information, visit the
cwRsync webpage or related
FAQ.
- (temporary blah: for reference, here's some more stuff I haven't
written out formally yet:
this file)

Benjamin L. Brown, released to the Public Domain.


